Woodworking - a Beginners Guide
- Ronco

- Jan 20, 2021
- 5 min read
January 20, 2021
As requested, the topic for today is woodworking – a beginner’s guide.
I am no pro but have been working in my shop for many years now. Over time I have amassed many tools, jigs, bits, bites, blades. If you are just starting out it can be overwhelming with all the gear out there. What do you need? How much is this going to cost? This is my take on what the basics are.
The first is to determine what kind of word working you will be doing. There is the larger furniture type projects, and then there are smaller ones. Knowing what kind of project you are going to undertake will determine what kind of tools and equipment you will need. Here are some of my favorite projects from the past.


I guess the next thing you need to figure out is how much space are to going to allocate for a wood shop. You definitely want a place with good ventilation. You might not like to work in the cold so you may need a place that you can heat in the winter. I use my garage, so wood projects in the winter are limited to nice weather 😊. If you are going to set up your shop in the basement, you should consider the dust thing. Even with good ventilation, dust will get everywhere. My shop has only been in my 2-car garage and I have to clean the shelving all the time as there is a deposit of fine woodworking dust. My garage has limited space and there always seems to be a car in the way. I have put all my large equipment on movable stands and rolling platforms. Once the car is moved out, I can place the equipment I need for the project by easily rolling them into place. When I am done, I clean up and put the all the equipment back against the wall and move the car back in. In a way, this is a good thing, as I have to clean up after every workday, which just keeps things neat and tidy.
So let’s start with the equipment I have. Again, depending on your budget and the type of projects, your list may be similar.
Table saw. It is crucial to have a good solid table saw. This will probably be the most expensive piece of equipment you get. It will be worth every penny. You should have a large “table” with a good solid fence. My table is 40” wide and 27” deep. The fence is 60” long. A roller stand is also a good addition. This will allow you cut wood of most any size. The smaller saws will work, but it just makes things way easier with the large table. Of course, if you are only working on smaller projects a small tabletop version would work just as well.
· King floor mount table saw: $1800
· DeWalt Table Top saw: $500
· Roller stand: $50


Miter saw. Another important saw is the Compound Miter saw. Currently I only have a fixed miter saw and it is a challenge to cut anything wider than 8”. There are many times where your stock is 12” wide and a compound sliding miter saw would be a great idea. A Miter saw is great for cutting your stock to length and then making angle cuts. While I was researching these saws I came across a great DYI Miter Saw Rolling Table. This might have to be my next project.
· DeWalt 12” Compound Sliding Miter Saw: $500
· DeWalt 10” Compound Miter Saw: $300


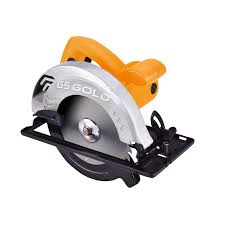
Handheld power saw. There are times when the table saw, or Miter saw just won’t work. The wood or project is too big or too heavy to lift or the cut is too awkward. A handheld saw is needed. Straight cuts are done with a power saw and curved cuts are done with a scroll or jig saw. If you plan on doing a lot of curved cuts a floor mounted band saw is the answer. MasterCraft (Canadian Tire) is a great source for this equipment. For most of the handheld power tools you can get the battery version. Makita and DeWalt make great cordless hand tools, but you will end up paying more for the cordless version. I stick to the plug-in type. I am always in my shop where power is always available, and I never have to worry about batteries dying.
· Handheld saw: $200
· Jig saw: $100
· Band saw: $500


Once you have rough cut your wood you need to start finishing it. This would include sanding, joining and planing,
Planer and Jointer. A planer is used to smooth the surface of piece of wood or to plane it down thinner. This may not always be required, depending on the original stock that you use. There are some pretty fancy planers out there that can plane large pieces of stock and can cost as much as $2500. I don’t need that kind of power and I don’t have that much room in my shop. I have gone with a smaller 13” tabletop version and mounted it on a rolling stand. It does 95% of the work I need. A jointer is used to plane the edge to ensure it is straight. The jointer, is again, similar in that you can purchase a big unit or a smaller tabletop version. My tabletop version does most everything I need. I struggled with joints in the past until I bought the jointer. It makes it really easy to match up different pieces of wood and keeps everything flush.
· DeWalt 13” Planer: $800
· Porter and Cable Jointer: $500


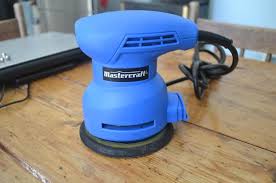
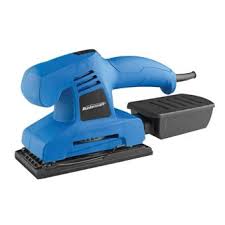
Sanders. Sanding can help you achieve great work. It is necessary unless you are going for that rustic look. I have a combination belt / disk sander. I use this most of the time. It does a great job of rough sanding all the wood before assembly. I also have a couple handheld sanders that I use once the project is assembled. An orbital sander, a belt sander, and a palm sander. The belt sander is used mainly to remove wood imperfections – major rough sanding. I don’t use this very much as the big belt/disk sanders does most of that work for me. Then use the palm or orbital sanders to finish the project. Again, the handheld tools are all available in cordless versions.
· Belt/Disc Sander: $400
· Orbital Sander: $100
· Belt Sander: $150
· Palm Sander: $ 50


So, as mentioned, I have mounted all my bigger equipment on rolling stands and platforms. Each stand is about $150 to $200, so that needs to be added to the cost above. Looking back, having the movable equipment is awesome. I don’t need to be fighting with a large table saw - I just roll it into place and it is good to go.
Part 2
· Drills – drill press, drills, bits
· Assembly – glues, clamps, biscuits, dowels,
· Finishing – stains, paints, lacquer
· Cleaning – vacuums, brooms,
· Other important considerations – hand tools
Part 3
· Step by step instructions for simple wood project.
If you need help, clarification or examples of any of the equipment or tools above, please let me know and I can expand further.
What are you wood working stories?
That’s it for now. Let’s hear what you have to say.
Ronco 😊


Comments