Woodworking - A Beginners Guide - Part 2
- Ronco

- Jan 21, 2021
- 5 min read
January 21, 2021
In the previous post I discussed the larger equipment you will need to get going in the woodshop.
Table saws, miter saws, planers, jointers, sanders, etc.
Now let’s have a look at the next steps – finishing and assembling your project. This is where the skill of a finishing carpenter is really developed. Ensuring that wood surfaces are smooth and clean, joints are tight, and everything is square, and level are some basic skills that everyone will need.

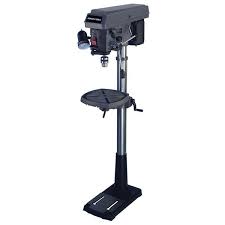
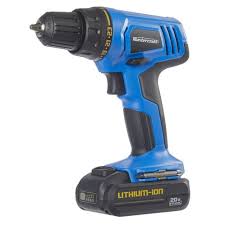
Drill. The drill is a valuable tool. I have a stand-up drill press. This works great to make clean controlled holes. Unfortunately, once you have started assembling your project the drill press is not the tool. You will need a hand drill. I have a battery operating drill / screwdriver. (I will chat about the screwdriver ability later). I use this thing all the time. I would suggest that you get one complete with 2 battery packs. One is always recharging. Of course, a drill is not good without good drills bits. There are standard combo packs which are readily available. These are good for most jobs. Once you get going, you may want to invest in good Forstner set of drill bits for larger holes and eventually even a larger hole saw bits.
· Stand-up Drill Press: $500
· Rechargeable Drill: $80
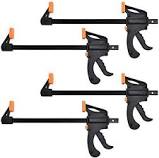
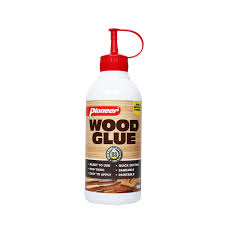
Assembly. This can be a topic all on its own. There are many ways to attach two pieces of wood. One common thread is glue. There are many options when it comes to glue. Most wood glues are a type of polyvinyl acetate (PVA). What I have found is that unless you have a very specific task your standard wood glue will do the trick. When stressed, a glued wood joint will not fail – the wood itself would fail first. As the glue hardens, you need a method to ensure the wood doesn’t move. A good set of clamps are required. These come in all shapes and sizes. You will quickly determine which size you need and how many of each. My clamp collection is extensive.
In addition to glue, you can also use screws. This works great, but you many need to “hide” the screws if it is on finished work. This is where my rechargeable drill (above) gets most of its use. A variable speed drive complete with adjustable torque is optimal. Now you need a full collection of screwdriver bits depending on the screws that you buy. My favorite is the square head – they just seem to work better for me. Another option for assembly is nails. The impact on the wood surface is minimal and the nail heads can be easily hidden. To do this right, a nail gun is the answer. Now you need a small compressor, hoses, fitting, etc. Fortunately, most of the larger hardware stores offer a combo pack that includes a small compressor and a nail gun for about $400.

Joints. If you watch some of the woodworking shows on TV / YouTube, you see these guys using all kinds of different joints for projects. The list seems to be endless. In the end, you need to experiment with different joints and use the ones that you are most comfortable with. Below are some examples. Each one has its own technique and may require specialized bits or blades.

Finishing. You have built a nice wood “thingy”. Now how are you going to finish it? For me, I either paint it or stain it. The only exception would be when I make a cutting board or some other project for the kitchen. You need to use a food grade mineral oil for those projects. In some instances, I will pre-finish some of the components before I assemble the project. It just makes it easier. Always be aware of what surface will be glued as these should not be finished first.
Painting is straight forward. A primer is a good start. Most paints now are designed with primer included. You can get any color you want and can color match just about anything. Get creative 😊. In the same fashion, there is a whole world stain. Different colors that look different on different kinds of wood species. The final step with stain is to apply a good lacquer or varnish to the project. I typically use a water base product as it is just easier to clean up. Lacquer is also available in the spray can for ease of use.

With either method above you must ensure that you finish the entire project – even the parts that are not visible. Wood breaths and absorbs moisture. A raw piece of wood will expand and contract differently than a finished piece. You want your project to expand and contract at the same rate. If there are unfinished areas, it will move differently. If this happens near a joint, then the joint could crack over time.
One suggestion is to use drop clothes and be ready for the clean up before you start. I also have a box of latex gloves that I use when I am staining. Again, the clean up is just that much easier.
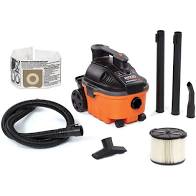
Cleaning. The biggest issue I have with woodworking is how to keep my garage clean. Sawdust and wood chips end up all over the place. Large power equipment will usually come with a port so you can connect a vacuum or dust collection system to it. This is great, but a shop dust collection system is a Cadillac item. Not only does it take up more space, but they are expensive. I have found a great little device that turns your shop vac into a dust collector – the cyclone. I then built a little rolling platform that holds my shopvac, the cyclone and all the vacuum tools so I can move it around wherever needed. The vacuum hose connects to the equipment, so the dust “spray” is limited. Over time there does seem to be a fine dust on everything in the garage, so I need to do a full clean every 4 months. Overall though, I am happy with this system.
· Dust Collection System: $500
· Cyclone: $30
· Shopvac: $120


Other considerations. There are virtually an endless number and kind of hand tools that you can get. Just walk down the aisle of your favorite hardware store. Hammers, rubber mallets, tape measures, squares, screw drivers, chisels, staplers, wrenches, hand saws and on and on. It has taken me years to get my collection. I did not even address wood species in this post. Again, so much to talk about. Hardness, color, durability – goes on forever. I’ll leave that one for another time.

I find working in my shop very therapeutic. I put on some good tunes (Rush or AC/DC) and just work away. But you NEED a plan. This doesn’t just happen. You need to design your project and consider all options. Before I start, I usually visualize the project in my head and analyze the joints and process to make sure I have everything covered. The worst is to assemble a project and then realize you forgot a step, or afterwards realize its easier if you did it a different way. This all comes with practice. Eventually you find your comfort level.
If you need help, clarification, or examples of any of the equipment or tools above, please let me know and I can expand further.
Next, I thought I would give step by step instruction for a simple wood project. One of the first things I built was a cutting board for the kitchen. To do it right you can use a lot of the tools and equipment described previously. That will be Part 3 of this series.
What are you wood working stories?
That’s it for now. Let’s hear what you have to say.
Ronco 😊


@CraigV
I will be down there as soon as they will let me. Would love to help you set up shop.
Bear in mind that no power tools are allowed when you are drinking - you want to keep all of you fingers.
Having said that there is nothing wrong with having a drink and just admiring your wood shop
@WillC
As my sister has said, my most complex joint is my hip joint 😊
Seriously, the most complex joint that I have tried is the Mortise and Tendon. I used this to try to get a specific look on a coffee table I was making. You really need some good tools to make the Mortise properly and the wood to be a snug fit. The good think is the most the mistakes are hidden in the joint itself. I’m sure if I tried it more, I would get better at it.
If I need a good strong joint, I will typically use a dowel system. I find it easier and with a drill press you can be pretty accurate.
Thanks @Ronco! I would like to suggest that you and your wife come down, we can hang out in the work area and survey what needs to be done and purchased over a drink, and then we head to Lowe's for a shopping spree before returning to the work area for more drinks. Maybe you should discuss the importance of a well stocked beer-fridge/wine cellar/spirits in future posts. You've always got great wine and whiskey available...
I've noted your point on the table saw not being combined with the workbench. I didn't think about cleanup as much as I thought about doing most of the work on my own, so needing a good sized area for what I'm cutting is going…
@Craigv
What you have is a great start. I didn’t know you already had room for a shop. I see in the picture one of the cyclone dust collectors. You need to get one of those. They are great and not too much money. One thing I forgot to mention in the post is that you need a good work bench. I wouldn’t recommend combining the table saw and work bench (as in the picture) unless you are forced to because of space requirements. You will find that your bench will be covered with project work and then you need to clear it off everytime if you need to use the table saw. It will become a pain…..
Ronco
What is the most complex joint you've tried and did you do it just to see if you could or was there something structural it was good for?